
1. Introduction
This document is an accompaniment to the Shimmer External Expansion Board (formerly known as the Shimmer AnEx Board). Its purpose is to be used in conjunction with the Shimmer External Expansion Board Tutorial Video to aid the user in getting started with the External Expansion Board.
The External Expansion Board enables an Analog Output Sensor, a Digital Output Sensor, a Serial UART or a Parallel Bus Interface to connect to Shimmer. The External Expansion Board is connected to a Shimmer device via the external connector and is positioned outside the Shimmer enclosure.
The External Expansion Board enables users to incorporate additional functionality to the Shimmer providing an outlet to develop their specific application to their own user requirements. It allows easy prototyping of 3rd party sensors or custom sensing solutions with Shimmer.
2. General Information
2.1. Pre-Requisites
- A Shimmer31 device programmed with appropriate firmware.
On Shimmer3, that is LogAndStream firmware, which streams data over Bluetooth and logs it to the SD card. Shimmer units are shipped with it, and Consensys installs updates.
- An External Expansion Board.
2.2. External Expansion Board Features
Easy access to Shimmer microcontroller signals using wire hole or solder pads.
+/-5VDC charge pump regulator with software-controlled enable pin2.
Software assignable User Control button.
Connect an auxiliary power supply.
2.3. Wire Connections
PCB Label |
Connector Pin# |
MSP430 Pin / Label |
Shimmer3 Function |
|
|---|---|---|---|---|
RX |
2 |
P3.5 / SA_SOMI_RXD |
USART A0 SOMI or RXD or GPIO A level shifter is required to interface with an RS-232 cable |
|
TX |
3 |
P3.4 / SA_SIMO_TXD |
USART A0 TXD or SIMO or GPIO. A level shifter is required to interface with an RS-232 cable |
|
CLK |
4 |
FLASH_SCLK_EXT |
USART B1 SPI CLK, or GPIO
|
|
SO |
5 |
P5.4 / FLASH_SOMI |
USART B1 SPI SOMI, or GPIO
|
|
SI |
6 |
P3.7 / FLASH_SIMO |
USART B1 SPI SIMO or GPIO
|
|
#RST |
8 |
RST / MSP_RESET_N |
Microcontroller Reset line – typically used to reset the board |
|
A0 |
12 |
P6.6 / ADC6_FLASHDAT2 |
Analog ADC input 6 or GPIO
|
|
A7 |
13 |
P6.7 / ADC7_FLASHDAT1 |
Analog ADC input 7 or GPIO
|
|
CTS |
16 |
P7.7 / ADC_15_RADIO_DC |
|
|
+3 |
17 |
PV |
3.0V regulated voltage. Do not exceed 100mA when using this connection. |
|
+5 |
N/A |
N/A |
5.0V regulated voltage. Do not exceed 12mA when using this connection. NOT compatible with Shimmer3. |
|
-5 |
N/A |
N/A |
-5.0V regulated voltage. Do not exceed 12mA when using this connection. NOT compatible with Shimmer3. |
|
G |
GND |
Ground Connection |
2.4. Board Layout
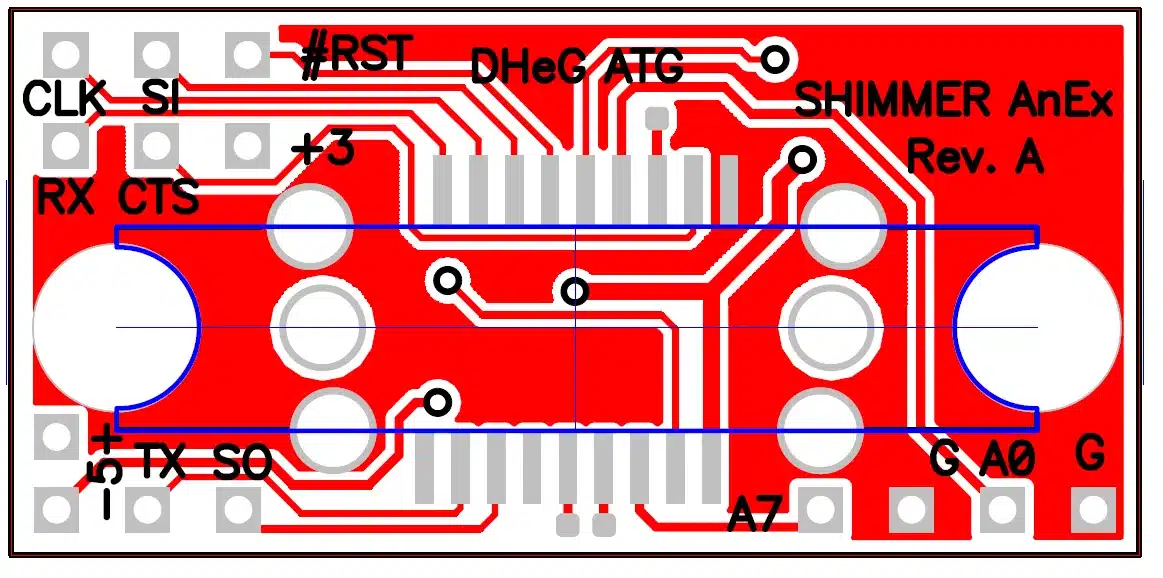
Figure 1: External Expansion Board Top View
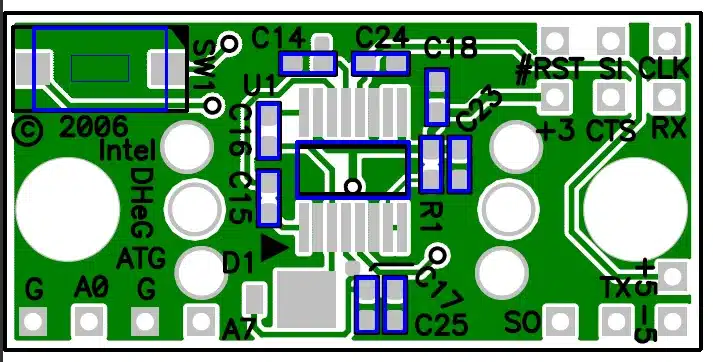
Figure 2: External Expansion Board Bottom View
3. Using the External Expansion Board (Typical Applications)
3.1. Connecting an Analog Output Sensor
Using the sensor specification, chose either +3, +5, or +/-5V3 as the power supply connections to the sensor (in order of preference). The output of the sensor should be tied to either the A0 or A7 ADC inputs4. If the output is outside of the range of the Shimmer ADC (3V max) an attenuator must be added.
If the sensor uses the bipolar power supply, the output must be AC-coupled via a series capacitor to an appropriate DC bias resistor network connected to the ADC input pin.
Example: A sensor requires +/-5V supply, and has a output of +/- 1.25V. A 10µF capacitor is used to couple a signal such that 1.5V = zero-signal by connecting a 100k resistor from A0 (ADC0) to +3 (3.0V) and a 100k resistor from A0 (ADC0) to G (GND).
Any remaining GPIO pins can be used to configure control pins on the sensor. Verify the configuration of any of these pins in the Shimmer application code.
3.2. Connecting a Digital Output Sensor using the SPI interface
Paying attention to the required master-slave relationship in your application (Shimmer is usually master), connect up the SI,SO, and CLK pins. Use another GPIO pin as a Chip Select to complete the digital interface. The UART0 module will need to be configured for SPI mode. For power supply connections chose either +3, +5, or +/-5V as the power supply connections to the sensor (in order of preference).
Remember that the Shimmer’s microSD storage is also connected to the SPI bus. An internal expansion board may also use this signal. The application must ensure that the bus is correctly multiplexed using the SPI0 chip-select signals.
Any remaining GPIO pins can be used to configure control pins on the sensor. Verify the configuration of any of these pins in the Shimmer application code.
Note for Shimmer3 users
When using the External Expansion Board with Shimmer3, the SPI bus is shared with the microSD, making the interface much more complicated than that for the PROTO3 Deluxe Expansion Board, which uses the dedicated internal bus. For that reason, Shimmer recommends use of PROTO3 Deluxe Expansion Board wherever possible. Furthermore, Shimmer recommends that the External Expansion Board should only be used in cases where MicroSD will not be used, and noting that this use case will receive limited support from Shimmer.
3.3. Connecting to a Serial UART
Similar to the SPI directions above, the UART0 module must be configured for UART operation. The output signals will be digital at a 3.0V reference. A level shifter IC or RS-232 level shifter may be used to interface with instrumentation or other computers.
3.4. Connecting a Parallel Bus interface
To use a parallel bus interface, most pins will need to be configured as GPIO instead of the default functionality. Up to a 9-pin bus can be configured.
3.5. Connecting an External Power Battery Pack
The PV_REG pad can be used to solder on a battery pack or power supply. This power supply will not charge the Shimmer battery and must be isolated by a Schottky diode when the Shimmer battery is also in use. This Schottky diode should be included in the users circuitry.
Note: Do not exceed 5.5VDC.
Note: Do not exceed 200mA.
When operating without a Shimmer battery, the recommended input voltage range is 3.1-5.0V
When operating with a Shimmer battery, the recommended input voltage range after an isolation diode is 4-5.0V
For example, a battery pack consisting of 3 “D” alkaline cells in series is used instead of the stock Shimmer battery. The resulting voltage will be 4.5V at start. The resulting battery pack will have over 18000mAh capacity. A Shimmer application burning 25mA will run for over 2years.
4. Firmware Considerations
4.1. User button
For Shimmer3, the user button on the External Expansion board is tied to P1.5 of the MSP430 (GPIO External).
4.2. Multifunction pins
The MSP430 processor uses multifunction pins. The functionality of the pin depends on firmware configuration. For example the pin A7 (ADC input 7) can be configured an ADC input or GPIO pin. For more information please refer to the MSP430 programmer’s guide and the LogAndStream source code. For anything else, contact us through our contact page.
Please refer to the later sections of this document for more details on using the Expansion Board with Shimmer3.↩︎
The 5V regulator is not compatible with Shimmer3.↩︎
Do not choose +/- 5V for Shimmer3.↩︎
Note that for Shimmer3, the pin marked A0 on the Expansion Board is tied to the A6 ADC channel.↩︎
Legal notices
Legal Notices and Disclaimer
Redistribution IS permitted provided that the following conditions are met:
Redistributions must retain the copyright notice, and the following disclaimer. Redistributions in electronic form must reproduce the above copyright notice, this list of conditions and the following disclaimer in the documentation and/or other materials provided with the document.
Neither the name of Shimmer Research Ltd. nor the names of its contributors may be used to endorse or promote products derived from this document without specific prior written permission.
THIS DOCUMENT IS PROVIDED BY THE COPYRIGHT HOLDERS AND CONTRIBUTORS “AS IS” AND ANY EXPRESS OR IMPLIED WARRANTIES, INCLUDING, BUT NOT LIMITED TO, THE IMPLIED WARRANTIES OF MERCHANTABILITY AND FITNESS FOR A PARTICULAR PURPOSE ARE DISCLAIMED. IN NO EVENT SHALL THE COPYRIGHT OWNER OR CONTRIBUTORS BE LIABLE FOR ANY DIRECT, INDIRECT, INCIDENTAL, SPECIAL, EXEMPLARY, OR CONSEQUENTIAL DAMAGES (INCLUDING, BUT NOT LIMITED TO, PROCUREMENT OF SUBSTITUTE GOODS OR SERVICES; LOSS OF USE, DATA, OR PROFITS; OR BUSINESS INTERRUPTION) HOWEVER CAUSED AND ON ANY THEORY OF LIABILITY, WHETHER IN CONTRACT, STRICT LIABILITY, OR TORT (INCLUDING NEGLIGENCE OR OTHERWISE) ARISING IN ANY WAY OUT OF THE USE OF THIS DOCUMENT, EVEN IF ADVISED OF THE POSSIBILITY OF SUCH DAMAGE.
