
1. Before you start
This guide takes a new Shimmer3 or Shimmer3R from the box to its first data: switching it on, charging it, pairing it with a PC, and a first stream or SD card recording. The Shimmer3/3R User Manual has the detail behind each step, and the specifications.
You need:
- A Shimmer3 or Shimmer3R. It arrives switched off, with the LogAndStream firmware installed, which logs to the SD card and streams over Bluetooth. The label on the Shimmer names the product.
- A way to charge it: a Shimmer Dock, Consensys Base or Multi Charger, connected to power. A Shimmer3R also charges from a USB-C cable.
- A Windows PC with Bluetooth, to stream from the Shimmer and to configure it.
- Consensys, Shimmer’s application for Windows. ConsensysBASIC is free and works with one Shimmer at a time. Installing in the Consensys User Guide says where to download it, and how to install it and the drivers for the Dock or Base.
2. Switch on and charge
2.1. Switch on
Use the slide switch on the side of the Shimmer (Figure 2‑1). While the Shimmer starts up, its lower LED steps through green, yellow and red . When it has started, the upper LED shows what it is doing (What the LEDs mean).
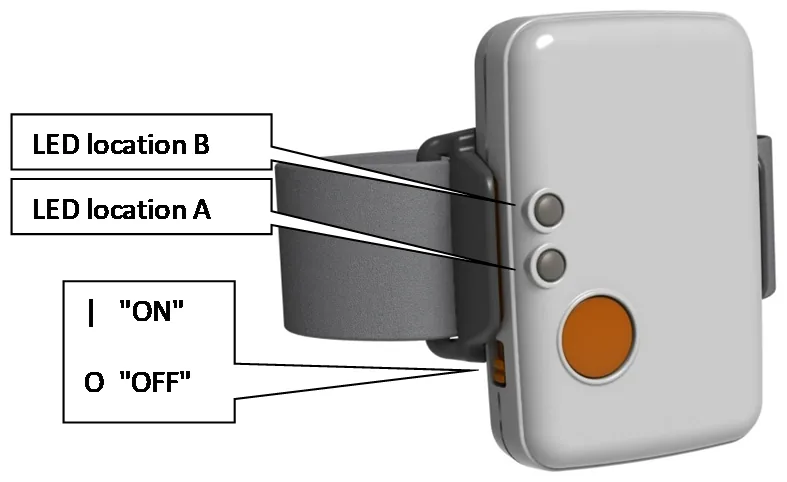
Figure 2‑1 The power switch and the two LED locations
A new Shimmer’s clock is not set, so its upper LED flashes green and blue together, fast (cyan on a Shimmer3R). Place the Shimmer in a Dock or Base while Consensys is running, and Consensys sets the clock from the PC.
2.2. Charge
Insert the Shimmer in a powered Shimmer Dock, Consensys Base or Multi Charger, with its Bluetooth ID label facing away from the USB cable. The connector is keyed: if it does not go in easily, check the orientation rather than forcing it.
While a switched-on Shimmer charges, its lower LED is red ; when the battery is full it turns green . A standard battery charges fully in about 4.5 hours. A Shimmer that is switched off still charges, but its LEDs stay dark.
Battery and charging in the User Manual has the other charging patterns, the charger’s limits and battery life.
3. Pair with your PC
A Shimmer streams to a PC over Bluetooth Classic, and needs pairing with the PC once.
- Switch the Shimmer on and keep it within about 10 m of the PC.
- In Windows, open Settings → Bluetooth & devices → Add device → Bluetooth.
- Choose the Shimmer’s Bluetooth Classic entry, where XXXX is the end of its Bluetooth address, printed on its label:
- a Shimmer3 is listed as Shimmer3-XXXX, and asks for the PIN 1234;
- a Shimmer3R is listed as Shimmer3R-XXXX-BT, and needs no PIN.
Do not pair the Bluetooth Low Energy entry (S3BLE-XXXX or Shimmer3R-XXXX-BLE): Consensys does not use it. Windows shows a paired Shimmer as Disconnected until an application connects to it; that is normal.
Pairing a Shimmer in the User Manual covers finding the COM port for other applications, and other operating systems.
4. Your first data
A Shimmer can stream its data live to the PC, or log it to its SD card with no PC nearby, or both at once.
4.1. Stream over Bluetooth
- In Consensys, open LIVE DATA. Every Shimmer paired with the PC is listed.
- Connect to the Shimmer, choose its sensors and sampling rate, and start streaming. Consensys plots the data and can record it.
While the Shimmer streams, its upper LED flashes blue, 1 s on and 1 s off . Streaming over Bluetooth in the Consensys User Guide shows each step.
To stream to an Android phone or tablet instead, use ShimmerCapture from Google Play. For your own software, see Software Development in the User Manual.
4.2. Log to the SD card
- Place the Shimmer in a Dock or Base. In Consensys, open MANAGE DEVICES, select the Shimmer and click CONFIGURE.
- Choose a Trial Name and an SD log recording option, how logging starts and stops (the User Button, used here, or undocking and docking), and the Shimmer’s sampling rate and sensors. Click WRITE CONFIG.
- Take the Shimmer out of the Dock or Base, and leave it switched on.
- Press the orange user button to start logging. The upper LED flashes green, 1 s on and 1 s off , while it logs.
- Press the button again to stop, then dock the Shimmer and click IMPORT in Consensys to bring the data onto the PC.
Do not dock a Shimmer while it is logging: stop it first, or switch it off. Logging to the SD Card in the Consensys User Guide shows each step, and Starting and stopping logging in the User Manual describes both ways of starting.
5. What the LEDs mean
The upper LED shows what the Shimmer is doing, and the lower LED its health: the battery, charging and errors. These are the patterns you will see most often:
| LED | What you see | What it means |
|---|---|---|
| Lower LED: green, yellow and red in turn | Starting up | |
| Shimmer3 Shimmer3R | Upper LED: green and blue together (Shimmer3R: cyan), flashing fast | The clock is not set. Dock the Shimmer with Consensys running |
| Upper LED: blue blip every 2 s | Waiting for a Bluetooth connection | |
| Upper LED: blue, solid | Connected over Bluetooth | |
| Upper LED: blue, 1 s on and 1 s off | Streaming | |
| Upper LED: green, 1 s on and 1 s off | Logging to the SD card | |
| Lower LED, docked: red, solid | Charging | |
| Lower LED, docked: green, solid | Fully charged | |
| Lower LED, not docked: green, yellow or red blip every 5 s | Battery high, medium or low | |
| Lower LED, not docked: green, flashing fast | The SD card is missing, or cannot be written |
Table 5‑1 The most common LED patterns
Every pattern, including those shown while logging and streaming together, in SD-sync mode and at a slow start, is in LED indicators in the User Manual.
6. Where next
- The Shimmer3/3R User Manual: the specifications, the platform and its accessories, and the LogAndStream firmware: configuration, logging, streaming, synchronised logging and the SD card data.
- The guide for your unit: IMU, GSR+, ECG, EMG, Bridge Amplifier+ or PROTO3 Series.
- The Consensys User Guide: configuring, logging, streaming, calibrating, and managing and exporting data.
- The Troubleshooting and FAQs, if something does not work as described here.
For anything else, contact us through our contact page.
Legal notices
Legal Notices and Disclaimer
Redistribution IS permitted provided that the following conditions are met:
Redistributions must retain the copyright notice, and the following disclaimer. Redistributions in electronic form must reproduce the above copyright notice, this list of conditions and the following disclaimer in the documentation and/or other materials provided with the document.
Neither the name of Shimmer Research Ltd. nor the names of its contributors may be used to endorse or promote products derived from this document without specific prior written permission.
THIS DOCUMENT IS PROVIDED BY THE COPYRIGHT HOLDERS AND CONTRIBUTORS “AS IS” AND ANY EXPRESS OR IMPLIED WARRANTIES, INCLUDING, BUT NOT LIMITED TO, THE IMPLIED WARRANTIES OF MERCHANTABILITY AND FITNESS FOR A PARTICULAR PURPOSE ARE DISCLAIMED. IN NO EVENT SHALL THE COPYRIGHT OWNER OR CONTRIBUTORS BE LIABLE FOR ANY DIRECT, INDIRECT, INCIDENTAL, SPECIAL, EXEMPLARY, OR CONSEQUENTIAL DAMAGES (INCLUDING, BUT NOT LIMITED TO, PROCUREMENT OF SUBSTITUTE GOODS OR SERVICES; LOSS OF USE, DATA, OR PROFITS; OR BUSINESS INTERRUPTION) HOWEVER CAUSED AND ON ANY THEORY OF LIABILITY, WHETHER IN CONTRACT, STRICT LIABILITY, OR TORT (INCLUDING NEGLIGENCE OR OTHERWISE) ARISING IN ANY WAY OUT OF THE USE OF THIS DOCUMENT, EVEN IF ADVISED OF THE POSSIBILITY OF SUCH DAMAGE.
